How To Change The WiFi Network On Your Ring Doorbell?
Ring doorbell is a wireless doorbell that can perform a lot more functions than just an ordinary doorbell. Other than performing the functions of a normal doorbell, it enables you to view and talk to the people who are at your doorstep using the video intercom system. This thing can not only be done at home but can also be done elsewhere. All you need is an internet connection and you can get in touch with your visitor.
The Ring Doorbell has a lot of incredible features. This app is very user-friendly and has made things a lot more easier because of wireless connectivity. If you wish to know how to change the Wi-Fi network on your Ring Doorbell, then take a look down below.

The First Wireless Connection
When you setup Ring Doorbell in your house, the first thing that you do is not connecting your doorbell to the home network. In fact, after putting your device on the setup mode, the first thing that you must do is to download the app on your smartphone and then set up your account. The app will connect your smartphone to the nearest Ring Doorbell device.

You must be thinking about how one can connect to Wi-Fi when the device is not even connected to the wireless network. When the Ring Doorbell device is in the setup mode, it creates its own wireless network temporarily. This network can be used for connecting the doorbell to the Ring app.
After that, you need to carry out instructions on your tab or smartphone to connect the Wi-Fi network of your home and for configuration of settings. Once the network is established, the temporary Wi-Fi network will stop the broadcast and your Ring device will get connected to your home's Wi-Fi network.

Entering the Setup Mode
One cannot connect to the home Wi-Fi network without going into the setup mode. Sometimes, you will be forced to run the Setup Mode. For running your device in the setup mode, you need to take off the faceplate from the device. In order to do that, press the black button and then leave it immediately.
You must not hold the back button for too long. After that, remove the battery from the doorbell and charge it. The battery should be 100% charged. This may take a long time so you have to wait patiently.

After that, turn on your device and check if it goes into the setup mode or not. In case this does not take your device to the setup mode, then hard reset your device. For doing this, press the black button and keep on pressing it for the next 15 seconds. This will restart your smart device and then the device will go into setup mode.
Chang Ring Doorbell WiFi Network

If you are considering changing the Ring WiFi network or your home Wi-Fi is not working properly due to some reason and you want to switch to another network, then you must know how to change the wireless network of your Ring Doorbell.
You can easily do so by using the Ring app. This is a very simple method but it may not work on every single device. Firstly, you need to open the Ring app and then move towards the cam.
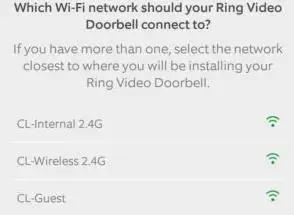
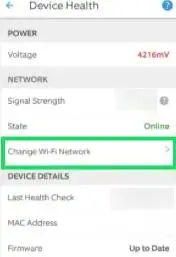
After that, go to Device Health and select the option of change WiFi network. A list of wireless networks will appear before you.

Choose the network of your choice. In some of the devices, you may see the option of Reconnect to Wi-Fi.
Once you select the option, you will be required to press the orange button. This means that you will have to unmount the doorbell from the wall.

If you feel that you have to make a lot of effort just to reach the orange button, then you can use another solution. For this, you will have to change the name of your wireless network to match the name of your previous network. This may not be the best solution but it will help you change the network.
Latest Blogs
How To Mount A Ring Doorbell Horizontally?
How To Disconnect Ring Doorbell From Alexa?
How To Install Any Ring Doorbell Without An Existing Doorbell?
How To Change The WiFi Network On Your Ring Doorbell?
Why Is My Ring Doorbell Not Showing Video?
 Published by: Jorg
 Brand: Ring Doorbell
 Last Update: 1 month ago
 Related Blogs
How to Connect a Ring Doorbell to WiFi?
How does Ring Doorbell Work with Alexa?
How to Change Wifi on Ring Video Doorbell 2?

Trending Searches
-
How To Setup WiFi On Samsung Refrigerators? 31 Oct, 25
-
How to Fix Hikvision Error Code 153? - 2026 01 Oct, 25
-
Fix Shark Robot Vacuum Error 9 Easily (How) 26 Nov, 25
-
How to Set up Arlo Camera? 08 Jun, 25
-
How to Reset Honeywell Thermostat WiFi? 19 Jun, 25

Recent Post
-
How to Install Kodi on Amazon Fire Stick? 08 Dec, 25
-
How to Connect Govee Lights to Alexa? 08 Dec, 25
-
How to Connect Kasa Camera to WiFi? 07 Dec, 25
-
How to Fix Eero Blinking White Problem? 07 Dec, 25
-
How to Reset Eero? 07 Dec, 25
-
Why is My ADT Camera Not Working? 06 Dec, 25
-
Merkury Camera Wont Reset? Fix it 06 Dec, 25
-
How to Connect Blink Camera to Wifi? 06 Dec, 25
Top Searches in ring doorbell