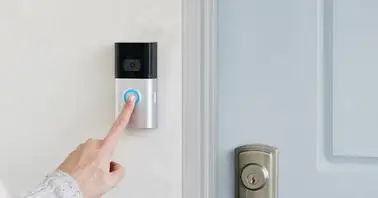
How to Install Ring Video Doorbell 3 Plus With an Existing Doorbell?
The latest addition to the Ring family, the Video Doorbell 3 Plus is a wireless, the battery performed smart doorbell that installs in minutes and delivers a sharp 1080p video.
It offers motion detection, support for Amazon Alexa voice commands, and IFTTT applets, and unlike the Ring Video Doorbell 2, it features the company's Pre-Roll buffering technology that captures four seconds of video before a motion event. In this post, you will learn how to Install Ring Video Doorbell 3 Plus With an Existing Doorbell.
The Ring Video Doorbell 3 Plus is a better choice for anyone looking to add a smart doorbell to their home without having to deal with wires. The daytime video showed fresh image detail with good color quality, and black-and-white night video appeared sharp and evenly illuminated.
Motion detection also worked well, but I had to enable People Detection mode to eliminate non-human activity alerts. Two-way audio was clean and appropriately loud, and the Pre-Roll tech worked perfectly.
Step to Install Ring Video Doorbell 3 Plus With an Existing Doorbell
Follow the instructions below to Install Ring Video Doorbell 3 Plus With an Existing Doorbell:
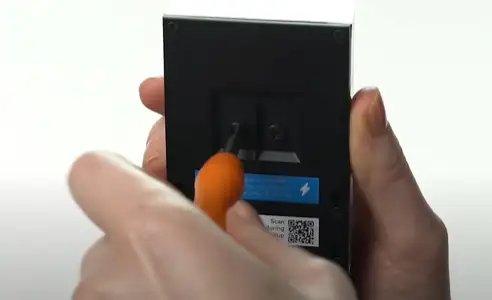
Step 1: Charge the Provided Battery
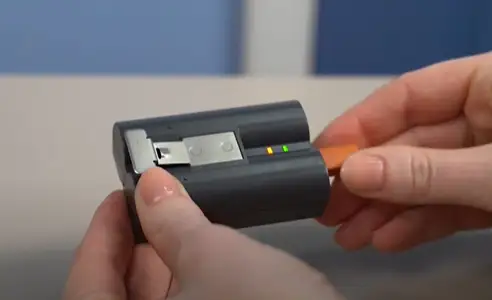
- Fully charge the battery by plugging it into a USB power source using the provided orange cable.
- When only one of the two LEDs on the battery is lit, the battery is fully charged.
- Place the battery into the bottom of your Ring Doorbell 3 Plus until it clicks into place.
Note: You may see a faulty battery discharge when setting up your Ring Video Doorbell 3 Plus if the device is not fully charged before use.
Please charge the battery completely before setting up your device.
Step 2: Remove Your Existing Doorbell
If replacing an existing doorbell, shut off power to your doorbell system at the breaker. Then remove the doorbell button from the wall and disconnect the wires.
Note: If connecting your Ring Doorbell 3 Plus to an existing doorbell, a transformer with a voltage of 8-24 VAC, 40VA max, 50/60Hz is required.
Note: DC transformers and most intercoms are not supported.
Step 3: Align Your Ring Video Doorbell 3 Plus
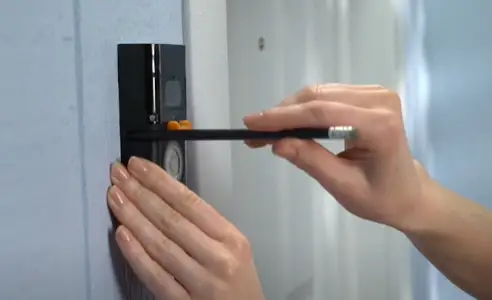
To correctly align your Ring Video Doorbell 3 Plus:
- Press the level tool (included in the box) into the small hole on the front of the Ring Doorbell 3 Plus, below the camera.
- Locate the Ring Doorbell 3 Plus next to your door at about 48 inches from the ground.
- Level the device using the level tool.
- Mark the positions for mounting holes with a pencil.
Step 4 (Optional): Drill the Mounting Holes (Only When Mounting on Brick, Concrete, or Stucco)
- Use the included drill bit in a power drill to drill holes at the positions you marked.
- Insert the included plastic anchors into the holes. You may need to use a hammer to get the anchors in.
If you’re mounting on wood or vinyl siding, you can skip this step.
Step 5 (optional): Attach the Wire Extensions.
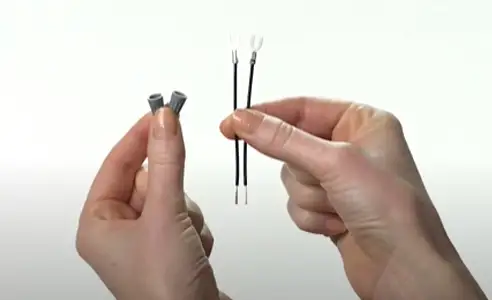
If you have trouble connecting the wires coming out of the wall to the back of your Ring Doorbell 3 Plus, use the provided wire extensions and wire nuts.
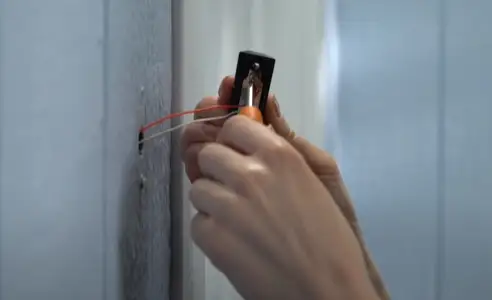
Step 6: Connect the Wires
Connect the wires coming out of your wall to the screws on the unit.
Either wire can connect to either screw. The order doesn't matter.
Note: Once properly wired, you should see the solid white light on the front of the device.
Step 7: Locate Your Ring Video Doorbell 3 Plus Over the Holes.
Ensure that you have removed the level tool from the front of the device.
Step 8: Screw in the Ring Doorbell 3 Plus
Feed all the wires (and the wire nuts if you used them) into your wall and secure your Ring Doorbell 3 Plus on the wall. Be sure you use all four included screws.
Step 9: Install the Faceplate
Locate one of the given faceplates on your Ring Doorbell by grooving it in at the top and clicking it into place.
Step 10: Install the Security Screw
Take one of the provided security screws and the star-shaped end of the screwdriver bit to secure the faceplate.
That’s it! These are all steps to Install Ring Video Doorbell 3 Plus With an Existing Doorbell. So, I hope after reading this post you will be able to Install Ring Video Doorbell 3 Plus With an Existing Doorbell. Thank you for reading this post!!
 Published by: Blaze
- Brand: Ring Doorbell
- Last Update: 3 months ago
 Related Blogs
How to Connect a Ring Doorbell to WiFi?
How does Ring Doorbell Work with Alexa?
How to Change Wifi on Ring Video Doorbell 2?
Trending Searches
-
How To Setup WiFi On Samsung Refrigerators? 31 Oct, 25
-
How to Fix Hikvision Error Code 153? - 2026 01 Oct, 25
-
Fix Shark Robot Vacuum Error 9 Easily (How) 26 Nov, 25
-
How to Set up Arlo Camera? 08 Jun, 25
-
How to Watch StreamEast on FireStick? 12 Nov, 25
Recent Post
-
How to Install Kodi on Amazon Fire Stick? 08 Dec, 25
-
How to Connect Govee Lights to Alexa? 08 Dec, 25
-
How to Connect Kasa Camera to WiFi? 07 Dec, 25
-
How to Fix Eero Blinking White Problem? 07 Dec, 25
-
How to Reset Eero? 07 Dec, 25
-
Why is My ADT Camera Not Working? 06 Dec, 25
-
Merkury Camera Wont Reset? Fix it 06 Dec, 25
-
How to Connect Blink Camera to Wifi? 06 Dec, 25
Top Searches in ring doorbell